How to Contribute to Milvus: A Quick Start for Developers
Milvus is an open-source vector database designed to manage high-dimensional vector data. Whether you’re building intelligent search engines, recommendation systems, or next-gen AI solutions such as retrieval augmented generation (RAG), Milvus is a powerful tool at your fingertips.
But what truly drives Milvus forward isn’t just its advanced technology—it’s the vibrant, passionate developer community behind it. As an open-source project, Milvus thrives and evolves thanks to the contributions of developers like you. Every bug fix, feature addition, and performance enhancement from the community makes Milvus faster, more scalable, and more reliable.
Whether you’re passionate about open-source, eager to learn, or want to make a lasting impact in AI, Milvus is the perfect place to contribute. This guide will walk you through the process—from setting up your development environment to submitting your first pull request. We’ll also highlight common challenges you might face and provide solutions to overcome them.
Ready to dive in? Let’s make Milvus even better together!
Setting Up Your Milvus Development Environment
First thing first: setting up your development environment. You can either install Milvus on your local machine or use Docker—both methods are straightforward, but you’ll also need to install a few third-party dependencies to get everything running.
Building Milvus Locally
If you like building things from scratch, building Milvus on your local machine is a breeze. Milvus makes it easy by bundling all the dependencies in the install_deps.sh script. Here’s the quick setup:
# Install third-party dependencies.
$ cd milvus/
$ ./scripts/install_deps.sh

# Compile Milvus.
$ make
Building Milvus with Docker
If you prefer Docker, there are two ways to go about it: you can either run commands in a pre-built container or spin up a dev container for a more hands-on approach.
# Option 1: Run commands in a pre-built Docker container
build/builder.sh make

# Option 2: Spin up a dev container
./scripts/devcontainer.sh up
docker-compose -f docker-compose-devcontainer.yml ps
docker exec -ti milvus-builder-1 bash
make milvus
Platform Notes: If you’re on Linux, you’re good to go—compilation issues are pretty rare. However, Mac users, especially with M1 chips, might run into some bumps along the way. Don’t sweat it, though—we have a guide to help you work through the most common issues.

Figure: OS configuration
For the full setup guide, check out the official Milvus Development Guide.
Common Issues and How to Fix Them
Sometimes, setting up your Milvus development environment doesn’t go as smoothly as planned. Don’t worry—here’s a quick rundown of common issues you might hit and how to fix them fast.
Homebrew: Unexpected Disconnect While Reading Sideband Packet
If you’re using Homebrew and see an error like this:
==> Tapping homebrew/core
remote: Enumerating objects: 1107077, done.
remote: Counting objects: 100% (228/228), done.
remote: Compressing objects: 100% (157/157), done.
error: 545 bytes of body are still expected.44 MiB | 341.00 KiB/s
fetch-pack: unexpected disconnect while reading sideband packet
fatal: early EOF
fatal: index-pack failed
Failed during: git fetch --force origin refs/heads/master:refs/remotes/origin/master
myuser~ %
Fix: Increase the http.postBuffer size:
git config --global http.postBuffer 1M
If you also run into Brew: command not found after installing Homebrew, you might need to set up your Git user configuration:
git config --global user.email xxxgit config --global user.name xxx
Docker: Error Getting Credentials
When working with Docker, you might see this:
error getting credentials - err: exit status 1, out: ``
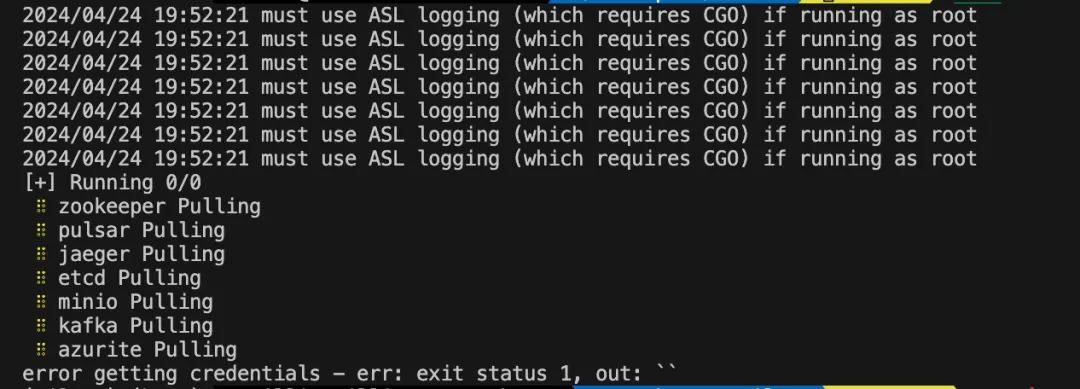
Fix: Open~/.docker/config.json and remove the credsStore field.
Python: No Module Named ‘imp’
If Python throws this error, it’s because Python 3.12 removed the imp module, which some older dependencies still use.

Fix: Downgrade to Python 3.11:
brew install python@3.11
Conan: Unrecognized Arguments or Command Not Found
Issue: If you see Unrecognized arguments: --install-folder conan, you’re likely using an incompatible Conan version.

Fix: Downgrade to Conan 1.61:
pip install conan==1.61
Issue: If you see Conan command not found, it means your Python environment isn’t properly set up.
Fix: Add Python’s bin directory to your PATH:
export PATH="/path/to/python/bin:$PATH"
LLVM: Use of Undeclared Identifier ‘kSecFormatOpenSSL’
This error usually means your LLVM dependencies are outdated.

Fix: Reinstall LLVM 15 and update your environment variables:
brew reinstall llvm@15
export LDFLAGS="-L/opt/homebrew/opt/llvm@15/lib"
export CPPFLAGS="-I/opt/homebrew/opt/llvm@15/include"
Pro Tips
Always double-check your tool versions and dependencies.
If something still doesn’t work, the Milvus GitHub Issues page is a great place to find answers or ask for help.
Configuring VS Code for C++ and Go Integration
Getting C++ and Go to work together in VS Code is easier than it sounds. With the right setup, you can streamline your development process for Milvus. Just tweak your user.settings file with the configuration below:
{
   "go.toolsEnvVars": {
       "PKG_CONFIG_PATH": "/Users/zilliz/milvus/internal/core/output/lib/pkgconfig:/Users/zilliz/workspace/milvus/internal/core/output/lib64/pkgconfig",
       "LD_LIBRARY_PATH": "/Users/zilliz/workspace/milvus/internal/core/output/lib:/Users/zilliz/workspace/milvus/internal/core/output/lib64",
       "RPATH": "/Users/zilliz/workspace/milvus/internal/core/output/lib:/Users/zilliz/workspace/milvus/internal/core/output/lib64"
   },
   "go.testEnvVars": {
       "PKG_CONFIG_PATH": "/Users/zilliz/workspace/milvus/internal/core/output/lib/pkgconfig:/Users/zilliz/workspace/milvus/internal/core/output/lib64/pkgconfig",
       "LD_LIBRARY_PATH": "/Users/zilliz/workspace/milvus/internal/core/output/lib:/Users/zilliz/workspace/milvus/internal/core/output/lib64",
       "RPATH": "/Users/zilliz/workspace/milvus/internal/core/output/lib:/Users/zilliz/workspace/milvus/internal/core/output/lib64"
   },
   "go.buildFlags": [
       "-ldflags=-r /Users/zilliz/workspace/milvus/internal/core/output/lib"
   ],
   "terminal.integrated.env.linux": {
       "PKG_CONFIG_PATH": "/Users/zilliz/workspace/milvus/internal/core/output/lib/pkgconfig:/Users/zilliz/workspace/milvus/internal/core/output/lib64/pkgconfig",
       "LD_LIBRARY_PATH": "/Users/zilliz/workspace/milvus/internal/core/output/lib:/Users/zilliz/workspace/milvus/internal/core/output/lib64",
       "RPATH": "/Users/zilliz/workspace/milvus/internal/core/output/lib:/Users/zilliz/workspace/milvus/internal/core/output/lib64"
   },
   "go.useLanguageServer": true,
   "gopls": {
       "formatting.gofumpt": true
   },
   "go.formatTool": "gofumpt",
   "go.lintTool": "golangci-lint",
   "go.testTags": "dynamic",
   "go.testTimeout": "10m"
}
Here’s what this configuration does:
Environment Variables: Sets up paths for
PKG_CONFIG_PATH,LD_LIBRARY_PATH, andRPATH, which are critical for locating libraries during builds and tests.Go Tools Integration: Enables Go’s language server (
gopls) and configures tools likegofumptfor formatting andgolangci-lintfor linting.Testing Setup: Adds
testTagsand increases the timeout for running tests to 10 minutes.
Once added, this setup ensures a seamless integration between C++ and Go workflows. It’s perfect for building and testing Milvus without constant environment tweaking.
Pro Tip
After setting this up, run a quick test build to confirm everything works. If something feels off, double-check the paths and VS Code’s Go extension version.
Deploying Milvus
Milvus supports three deployment modes—Lite, Standalone, and Distributed.
Milvus Lite is a Python library and an ultra-lightweight version of Milvus. It’s perfect for rapid prototyping in Python or notebook environments and for small-scale local experiments.
Milvus Standalone is the single-node deployment option for Milvus, using a client-server model. It is the Milvus equivalent of MySQL, while Milvus Lite is like SQLite.
Milvus Distributed is the distributed mode of Milvus, which is ideal for enterprise users building large-scale vector database systems or vector data platforms.
All these deployments rely on three core components:
Milvus: The vector database engine that drives all operations.
Etcd: The metadata engine that manages Milvus’s internal metadata.
MinIO: The storage engine that ensures data persistence.
When running in Distributed mode, Milvus also incorporates Pulsar for distributed message processing using a Pub/Sub mechanism, making it scalable for high-throughput environments.
Milvus Standalone
The Standalone mode is tailored for single-instance setups, making it perfect for testing and small-scale applications. Here’s how to get started:
# Deploy Milvus Standalone
sudo docker-compose -f deployments/docker/dev/docker-compose.yml up -d
# Start the standalone service
bash ./scripts/start_standalone.sh
Milvus Distributed (previously known as Milvus Cluster)
For larger datasets and higher traffic, the Distributed mode offers horizontal scalability. It combines multiple Milvus instances into a single cohesive system. Deployment is made easy with the Milvus Operator, which runs on Kubernetes and manages the entire Milvus stack for you.
Want step-by-step guidance? Check out the Milvus Installation Guide.
Running End-to-End (E2E) Tests
Once your Milvus deployment is up and running, testing its functionality is a breeze with E2E tests. These tests cover every part of your setup to ensure everything works as expected. Here’s how to run them:
# Navigate to the test directory
cd tests/python_client

# Install dependencies
pip install -r requirements.txt

# Run E2E tests
pytest --tags=L0 -n auto
For in-depth instructions and troubleshooting tips, refer to the Milvus Development Guide.
Pro Tip
If you’re new to Milvus, start with Milvus Lite or Standalone mode to get a feel for its capabilities before scaling up to Distributed mode for production-level workloads.
Submitting Your Code
Congrats! You’ve cleared all unit and E2E tests (or debugged and recompiled as needed). While the first build can take some time, future ones will be much faster—so no need to worry. With everything passing, you’re ready to submit your changes and contribute to Milvus!
Link Your Pull Request (PR) to an Issue
Every PR to Milvus needs to be tied to a relevant issue. Here’s how to handle this:
Check for Existing Issues: Look through the Milvus issue tracker to see if there’s already an issue related to your changes.
Create a New Issue: If no relevant issue exists, open a new one and explain the problem you’re solving or the feature you’re adding.
Submitting Your Code
Fork the Repository: Start by forking the Milvus repo to your GitHub account.
Create a Branch: Clone your fork locally and make a new branch for your changes.
Commit with Signed-off-by Signature: Ensure your commits include a
Signed-off-bysignature to comply with open-source licensing:
git commit -m "Commit of your change" -s
This step certifies your contribution is in line with the Developer Certificate of Origin (DCO).
Helpful Resources
For detailed steps and best practices, check out the Milvus Contribution Guide.
Opportunities to Contribute
Congrats—you’ve got Milvus up and running! You’ve explored its deployment modes, run your tests, and maybe even dug into the code. Now it’s time to level up: contribute to Milvus and help shape the future of AI and unstructured data.
No matter your skillset, there’s a place for you in the Milvus community! Whether you’re a developer who loves solving complex challenges, a tech writer who loves writing clean documentation or engineering blogs, or a Kubernetes enthusiast looking to improve deployments, there’s a way for you to make an impact.
Take a look at the opportunities below and find your perfect match. Every contribution helps move Milvus forward—and who knows? Your next pull request might just power the next wave of innovation. So, what are you waiting for? Let’s get started! 🚀
| Projects | Suitable for | Guidelines |
|---|---|---|
| milvus, milvus-sdk-go | Go developers | / |
| milvus, knowhere | CPP developers | / |
| pymilvus, milvus-sdk-node, milvus-sdk-java | Developers interested in other languages | Contributing to PyMilvus |
| milvus-helm | Kubernetes enthusiasts | / |
| Milvus-docs, milvus-io/community/blog | Tech writers | Contributing to milvus docs |
| milvus-insight | Web developers | / |
A Final Word
Milvus offers various SDKs—Python (PyMilvus), Java, Go, and Node.js—that make it simple to start building. Contributing to Milvus isn’t just about code—it’s about joining a vibrant and innovative community.
🚀Welcome to the Milvus developer community, and happy coding! We can’t wait to see what you’ll create.
Further Reading
- Setting Up Your Milvus Development Environment
- Deploying Milvus
- Running End-to-End (E2E) Tests
- Submitting Your Code
- Opportunities to Contribute
- A Final Word
- Further Reading
On This Page
Try Managed Milvus for Free
Zilliz Cloud is hassle-free, powered by Milvus and 10x faster.
Get StartedLike the article? Spread the word
